Level Up Your Graphics with Blend Modes
Having eye-catching and impressive graphics can greatly impact a business. Viewers may decide whether or not to read an article, buy a product, or call a company completely based on how they interact with a graphic. Though it does help to have a professional creating these graphics, you don’t need to be a graphic designer to make an engaging graphic. Sometimes it’s all about knowing the right tricks.
However, there is a bottomless pit of tricks and effects inside photoshop. It can be a dangerous hole to go down. Read below to learn about one trick that can take your graphics to the next level, including when and how to use it.
Blend Modes to the Rescue
Staying simple is always the best way to go if you’re not sure what to use. Blend modes are an effect every graphic designer should be utilizing, as long as they’re used at the right time and place.
Blend modes do a lot and have many different purposes. If you’re making a graphic that is supposed to look flat, an aesthetic that many graphics use, blend modes aren’t needed (unless you want it to look like flat paper, which can look amazing). However, in these instances below, blend modes can save the day!
Aside from photo editing, the main use for blend modes is adding texture. Adding texture to your graphics can make them stand out and add depth. In particular, if you’re keeping the graphic online, a place full of 2D images, texture can really catch someone’s eye.
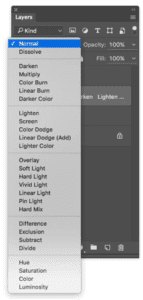
Blend modes allow you to use a photo of a texture (taken by yourself or found online), layer it over a graphic, and blend the two, resulting in a texturized graphic. You can find the dropdown menu for them on the right side of photoshop, above the layers.
The first reason for using blend modes is to make a flat graphic more engaging.
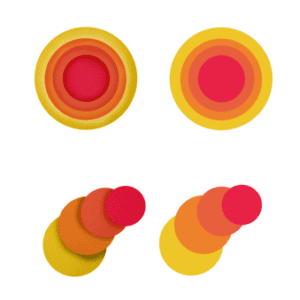
The only difference between the graphics on the right and on the left is that the left side is using the blend mode called Multiply and a paper texture.
Here’s a quick step-by-step on how to use blend modes:

1. Create a simple graphic, built with flat shapes.

2. Download a texture from Google Images or a stock website and drag it into your photoshop file above the shapes.

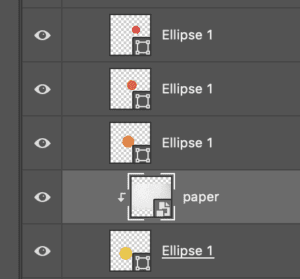
3. Right-click on the texture and click “Create Clipping
Mask” over one of the flat shapes.
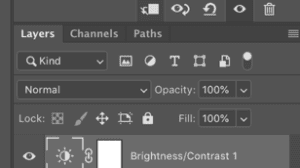
 4. Now for the blend mode! While the texture layer is selected, switch the blend mode from Normal to Multiply.
Repeat steps 2–4 over each flat shape.

5. Using the brush tool, paint shadows under each shape. They can look as sloppy as you want because after you draw them, you will switch their blend mode to Multiply.

6. And you quickly have a textured graphic!
Another time to use a blend mode is to completely change the look and feel of a pre-existing graphic.
You can take a pre-existing image of any kind and layer it over a texture in photoshop for a whole new style.


Blend modes should also be used for creating mockups.
If you’re trying to show someone what an end product is going to look like, you can use blend modes to accurately show the product without having to actually produce it.
For example:


Even if it’s just overlaying a blue rectangle over a photo to make everything tinted blue, blend modes are extremely useful and very simple to get the hang of.
For more quick and easy Adobe Suite tips, check out this blog post about creating icons written by Juan Pablo, our Design Director at Online Optimism.