Professional Headshots are Important
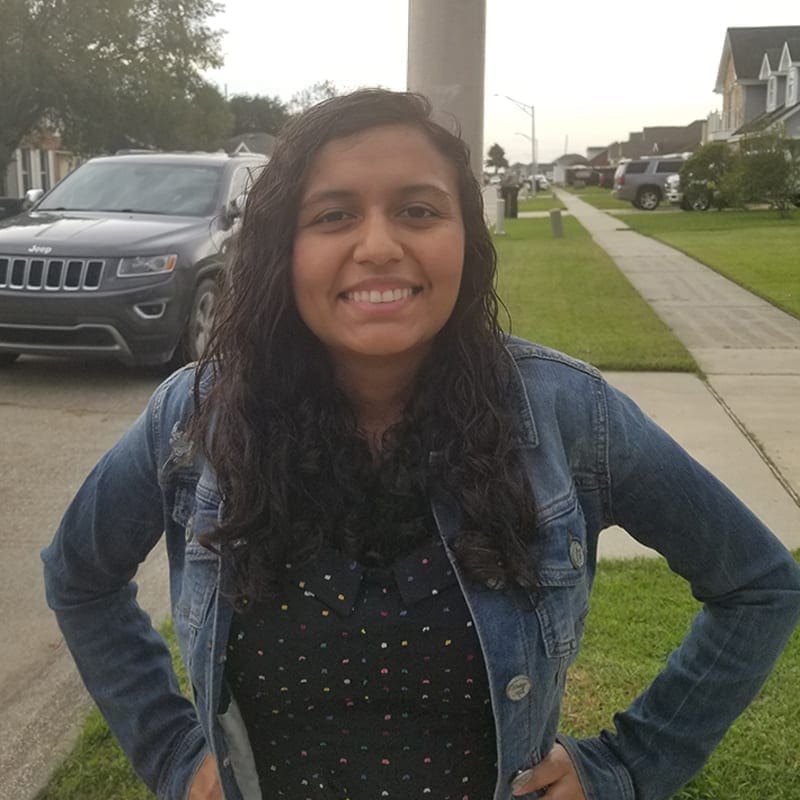
First off, let’s define what a headshot is. A headshot typically refers to a photograph where a person is shown from their heads to just past their shoulders. A professional headshot, specifically, is a photograph that you can show off to your boss, colleagues, and clients in order to confidently represent you or your business. Having a professional headshot of yourself is becoming more and more of a necessity in the modern digital age. However a lot of people either don’t have one or one that is of a professional quality.
Some examples of where professional headshots can come into play are: your personal LinkedIn account and various social media, about and staff pages on websites, and for online marketing material where someone needs a photo of a person to go along with a quote. If you’re a company, it’s nice for people to see your staff. People like seeing faces. It makes companies seem more trustworthy and connected. It says we’re not a faceless corporation. We’re people, and we care.
Headshots are impressions and impressions are everything. You might be the nicest, most competent person in the world, but if you have a bad headshot or none at all then people might not want to see you or do business with you. Here at Online Optimism, we know the importance of having nice professional photos because we offer a 2 hour photoshoot session as a part of our package of New Orleans social media services.
Preferably it’s better if you can get professional headshots done by a professional photographer. However, if you neither have the budget to spare nor the time to go to one, it’s not the end of the world. Smartphones these days have pretty good cameras built into them. Here are some tips and tricks for getting some nice headshots with your smartphone.
Tips for Setting Up
Have someone else take the photo
I have never mastered the art of the selfie. Ever. Thankfully, it’s better that you have someone else take your picture anyway. The rear-facing camera on your phone takes photos at a much better quality than the front-facing one. Your chosen photographer should take your photo with both hands on the smartphone and elbows in for stability. If you don’t have a friend/colleague that can take your photo, then a tripod is always an option.
Give yourself time
If you or the person taking the photo has an appointment in 15 minutes, then that’s probably not the time to have your photoshoot. Schedule a decent amount of free time for your headshots. You don’t want to stress or rush— that does not produce good photos. Your perfect shot may take time. It may take 5 shots or 50. Take more photos than you think you may need. If you give yourself enough time, a really good headshot can pay dividends.
Choose good lighting

Picture taken in evening

Picture taken at noon with harsh sunlight
Choosing good lighting is essential for receiving nice photographs. Outdoor lighting is best, but there are better times to take pictures outside than others. Avoid taking photos around noon when the sun is at its highest. The sun at this time creates very deep shadows and harsh highlights which can be very unflattering. Generally, overcast cloudy days are best for photography or times such as dawn or dusk. These days and times provide more even lighting.
If for logistical reasons you have to take the photos inside, try shooting in a place lit by a window. Make sure not to take a picture directly in the direction of the sun. Have your photographer with their back to the window, but with the light shining on you. It’s also a good idea to not have competing light sources. If you’re using your window for light, turn off the electrical lights.
Pick a good background
Avoid using busy backgrounds. A plain wall is fine. The focus is on you after all. A plain wall, a brick one, or even a wooden fence are all good choices. If you are doing a series of headshots with multiple employees, then it’s better to have a consistent image and use the same background. You should also make sure there is a lot of breathing room around you in your photos. This can become especially useful if you’re taking staff photos and need to crop them all to be the same size in the end.
Also, watch out for anything that looks like it’s sticking out of your head and body too. The worst thing is thinking that you had a perfect photo and then noticing a light pole or fixture protruding from the top of your head in the background.

Good background: plain brick wall
Bad background: busy background with too much going on
Tips for You
Dress Appropriately
Headshots don’t show much in the way of clothing. Despite this, I’d still advise dressing up. If you’re a business person, then maybe dress up in a nice suit or blouse. Just that hint of a nice outfit peaking through makes all the difference in how someone can perceive you. If you’re a graphic designer like me, then maybe wear a nice button down or business casual dress. Overall just dress like you’re going to work or an interview.
Watch out for busy patterns on clothes or any clothes that have graphic imagery or words. They may take the focus away from you. It’s also important to be aware of what background you’re using. It wouldn’t be good to accidently blend into a wall after all.
Pose for the Camera
Some general tips for good posing in front of the camera is to have your chest out, shoulders back, body turned slightly sideways, but having your face straight facing the camera. Making sure your chin is down and not pointing up at the sky is also a good idea. The latter may be a problem for shorter people, like me, who have a tendency to look up. That’s why it’s also good to have a second person during your photoshoot, so they can double check your posing. If you feel awkward posing, it might be best to practice in a mirror first and take a couple photos in the beginning just to get over that awkwardness.
Tips for Your Phone
Have HDR On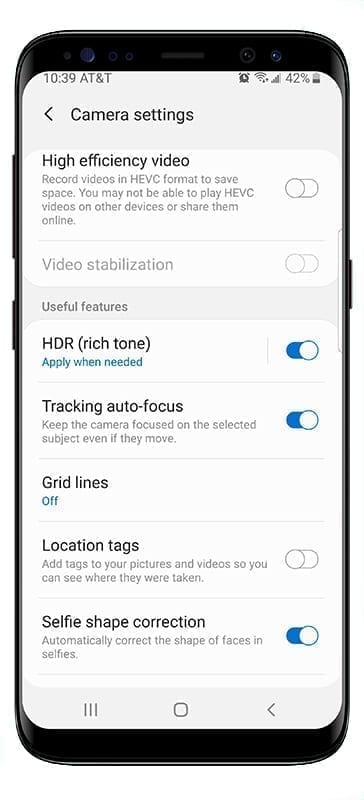
Most smartphones should have an HDR feature as a setting in the camera. HDR stands for high-dynamic range imaging. It essentially makes it so that your photos have a larger range of color and lighting. This can help compensate for uncooperative lighting by eliminating unnecessary shadows and toning down intense lighting.
Focus
Make sure your photographer properly focuses the camera on your phone. It’s as easy as tapping the screen on the area you want focused.
Don’t Use Zoom
Unless your camera has a zoom lens, digital zoom just crops your image and yields a lower resolution photo. If you need to zoom in your photos, have your photographer just step forward a couple steps.
Post-Processing
Your basic smartphone should have quite few editing features such as cropping, rotating, flipping, and light adjustments such as exposure, brightness, and contrast. I suggest playing around with these to touch up your photos a little. And if you really want to go the extra mile, you can get a post processing app for photos like Adobe’s mobile version of Lightroom. Here’s an article if you’re curious about some more post-processing apps.
Smile
At the end of the day, it’s important to have a professional image. Having a professional headshot helps with that goal. It’s important to represent yourself or your company in the best possible light that you can, and I hope these tips and tricks help you do that. Have a nice photography session and remember: relax and smile!