How to Post the Perfect Instagram Advertisement
 Now that Instagram advertising is open to everyone, advertising on Instagram is becoming a more popular and effective way for businesses and brands to market themselves to target audiences. Not only will it increase traffic on your website, but it is a great way to build your brand, sell your product or services, and develop a personality for your business while establishing trust between you and your audience. Instagram can help you to learn what your potential customers like and dislike based on their hashtags, tags, “likes”, and location tags.
But how do you even get started?
Below I’ll take you step by step to creating the perfect Instagram ad to help you reach new audiences and generate sales!
STEP 1: Make sure you have an updated version of Power Editor.
This is a Facebook Ads Manager tool that organizes, monitors, and gives you the resources to create advertisements for Facebook, and now Instagram.
*NOTE* If you have an Ad Blocker for your browser, Power Editor might not work. Turning it off just for that specific page will give you the freedom to use it.
STEP 2: Connect your Facebook business page to Power Editor
This is a good time to check and make sure that your business’s Instagram is connected to Facebook. You can do this by going to your Facebook page settings > Instagram Ads > Add an Account.
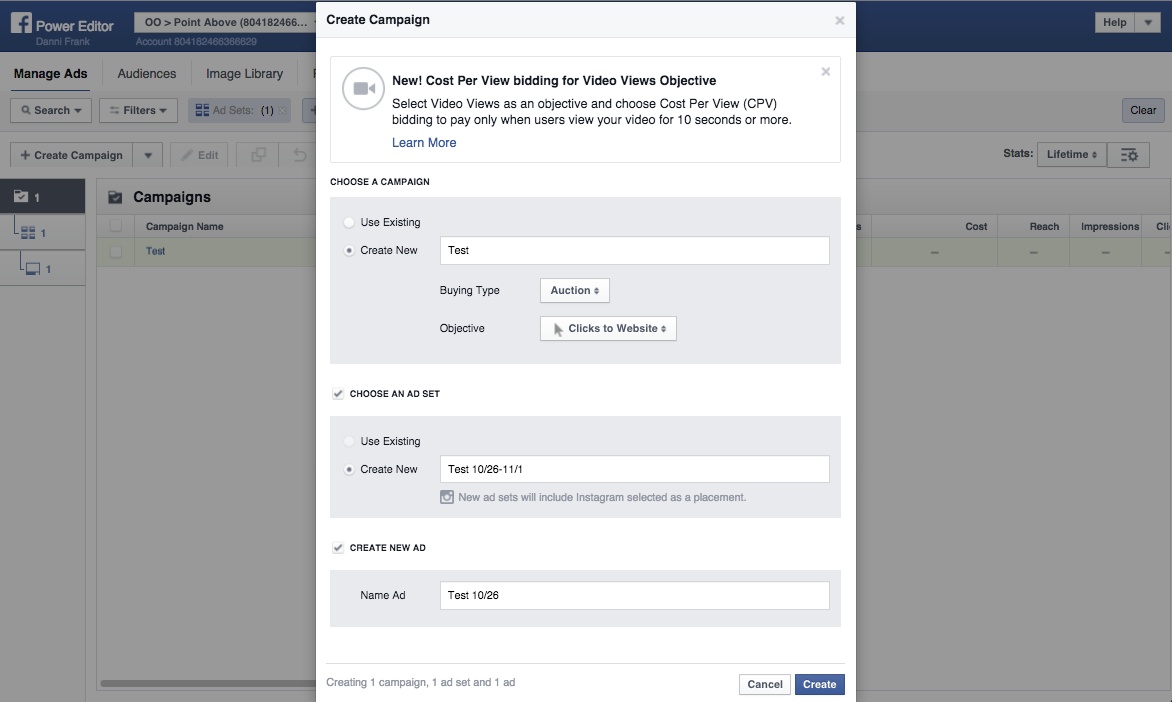
STEP 3: Choose or create a new campaign, ad set, and ad.
The campaign should be the overall general campaign, or if you are planning on managing multiple Instagram accounts, it can be named for the specific business. An ad set should be named for the grouping of ads, include the week those ads are running (i.e. Restaurant Ads 11/02- 11/08). The ad should be specifically named to go along with the content of the ad. I recommend including the date you are posting in the name of the ad as well.
Make sure the selected buying type option reads “Auction”. Unfortunately at this time Instagram does not offer advertising for a fixed price. After this you can select what objective you are attempting to produce with this ad. “Clicks to Website”, “Mobile App Installs” and “ Video Views” are the options currently supported by Instagram.
STEP 4: Setting the Budget, Schedule, Audience and More
You will see three tabs on the far left of the screen. Select the middle tab, which will bring up your “Ad Sets” page. You will need to complete a few steps on this page.
- Chose whether you want to set a Daily Budget or a Lifetime Budget for your ads within the ad set and then enter the amount you would like to spend.
- Next you will schedule a start time as well as a start date and end date for your ad. You may also choose to not schedule an end date and allow the ad to run as ongoing. *NOTE* Keep in mind who your audience is when deciding the time of day to post your ad. Take into consideration when the majority of your target audience will be looking at their Instagram feed. 5pm on weekdays could be a good time for reaching professionals, because most people are getting off work and using their phones to unwind from a long day.
- Click “edit audience” to choose specific locations, demographics, interests, and other factors that will help you to reach your desired audience with the post. Click browse to help find keywords to use that will help craft the audience. Remember to add as many demographics, interests, and behaviors as you can to create your ideal audience who will find your ad interesting.
- I suggest saving the audience you created so when you come back to create another ad for the same Instagram page, you can target the same audience without having to go back and select every factor over again.
- Under placement, you can choose on which platforms your ad will show. If you only want your ad to appear on Instagram, uncheck the other options.
- Now you will choose your pricing option. You may decide to either pay a bid per link click, or set the bid price you are willing to pay up to.
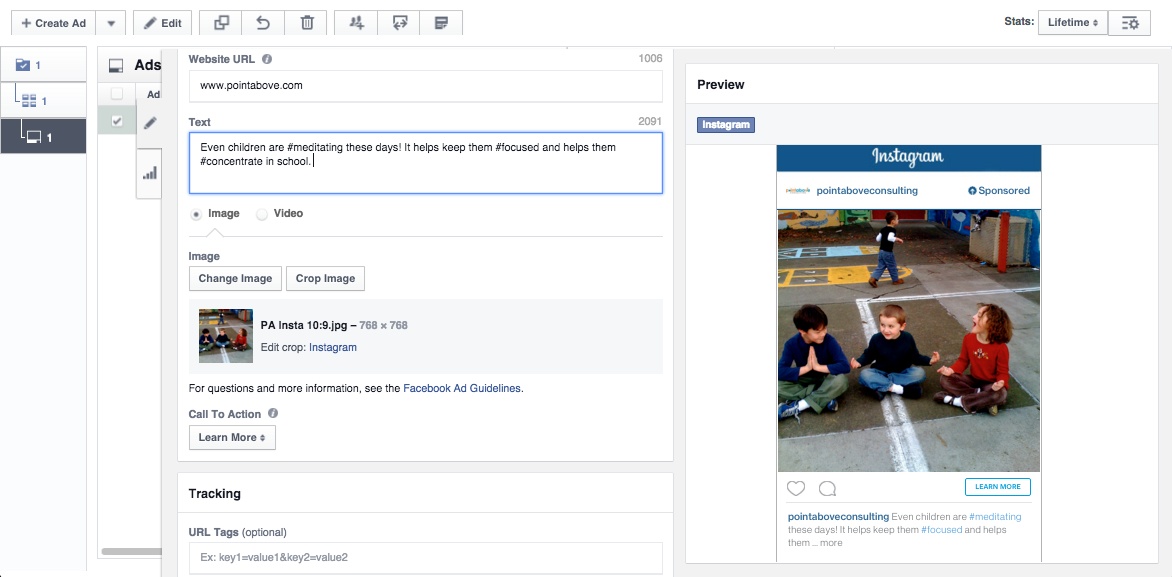
STEP 5: Creating the Actual Ad
Select the “Ad” tab, located under the “Ad Set” tab. At this screen you will need to complete a few sub-steps.
- You will be asked to select your Facebook Page and then a connected Instagram account.
- Choose between a single picture or video ad or multiple images in a carousel. For the latter option you can chose up to five images for the same price.
- If you selected “Clicks to Website”, enter your website’s URL.
- Enter the text you want to accompany your image or video.
- Now you may select and upload your image. You will see a preview of your ad on the right side of the screen.
- Under “Call To Action” you will choose what the button that links your audience to your website or app says. You can choose from many different calls to action. For example, if your ad is for a clothing store, you may choose the “Shop Now” option so potential customers will see that by clicking, they will be redirected to your business’s online store.
STEP 6: Upload Changes
Congratulations! You have reached the final step and are ready to post your perfect Instagram advertisement. At the top of the page, click the green “Upload Changes” button and your ad will be scheduled to post for the predetermined date and time you set in step 4.
You can increase the amount of ads in an ad set or campaign at anytime. Don’t forget to go back to Power Editor to monitor how your ad is performing so you can use these statistics for the next ad you post. Advertising with Instagram is an ever-growing marketing tool that more and more businesses will start utilizing. Start your advertising today and stay ahead of your competition. After using this tool you will see an increase of traffic to your site, higher sales, and a connection with your customers. Who could ask for anything more?